

Call me at +91 9997833350, if you are not happy with your vendors/service providers/printer/manufacturer related to website design, printing, outdoor/ digital/ print/ electronic media promotion, branding & customized stationary in #DEHRADUN.
Sunday, 23 December 2012
Monday, 26 November 2012
ABCD Chart for Kids

Hi! This is Sumit, a freelance graphic designer. I designed this chart for small kids who don't know small-alphabets. The kiddish font and colorful illustrations making it attractive for kindergarten. For high resolution images for ABCD Chart and PDF or PNG file please contact us to mediasixteen@gmail.com...

Children will love these illustrations. Here I have uploaded all the vector designs. I have used very funny and colorful images for all alphabets like apple, ball, chair, door, egg, fish, girl, hat, ice, jug, kite, leaf, moon, net, oat, pencil, quilt, robot, star, tap, umbrella, vase, watch, x-ray, yo-yo and zip for z. All photos background is fully colored according to theme of the object.

As you can see that the gradient background for Kite adding extra beauty to the design. You can also see the Moon's background there are night seen of sky showing some stars around alphabet. If you are looking for a Alphabet chart specifically designed for you then come to us we will make your imagination true. We are a design studios specialized in children books & illustrations. We design creative rhyme books and stickers. We also provide printing services all over the world. So, if you are looking for cheap and attractive ABCD Charts from India then call to us...
Thanks for your time.
 |
| Size of the ABCD Chart is 12"x18" (inch) and it is printed on 300 GSM Art Paper. If you want this printed for your kid then contact me at +91 9760829608 or mail at mediasixteen@gmail.com CLICK HERE TO BUY ABCD CHARTS |
Panorama View Technology
Today I was checking a website of Jaypee Hotel Masourrie and it was great to see the Images in Panorama View. Here you can also check click to see.
It was great to see 360 degree view of photographs. We can see whatever we want to see, every detail of the picture or site was so clear. It was adding a smashing creativity to the website. And I know the users will feeling so great to see where they will stay and enjoy their life.
Then, I next moved to Wikipedia and starting to know more about this view. Wikipedia says "Panoramic photography is a technique of photography, using specialized equipment or software, that captures images with elongated fields of view. It is sometimes known as wide format photography. The term has also been applied to a photograph that is cropped to a relatively wide aspect ratio. While there is no formal division between "wide-angle" and "panoramic" photography, "wide-angle" normally refers to a type of lens, but using this lens type does not necessarily make an image a panorama. An image made with an ultra wide-angle fisheye lenscovering the normal film frame of 1:1.33 is not automatically considered to be a panorama. An image showing a field of view approximating, or greater than, that of the human eye – about 160° by 75° – may be termed panoramic. This generally means it has an aspect ratio of 2:1 or larger, the image being at least twice as wide as it is high. The resulting images take the form of a wide strip. Some panoramic images have aspect ratios of 4:1 and sometimes 10:1, covering fields of view of up to 360 degrees. Both the aspect ratio and coverage of field are important factors in defining a true panoramic image."
I started to exploring more examples for this, it was great to view this kind of images. The next question was how to create it?
I found a website "http://gardengnomesoftware.com/pano2vr.php" and there was a software called "Pano2VR" to create this view.
Check the website and know more about this technology. It is great to create a portfolio with this technology. Thanks "Pano2VR Team" to create this software...
Copy the downloading link from that website:
http://gardengnomesoftware.com/pano2vr_download.php
Thursday, 8 November 2012
Freelance Graphic Designer | Sumit Pundeer
“Dream comes true” it is true. Hi,
my friends this is Sumit Pundeer. I had a dream to work from home as a
Freelance Graphic Designer. I hate busy cities, I always wanted to work freely.
My mentality was affected by a studio of Delhi, Henu Art Studio. It was great
to work with Henu Ma’am. She is a great BOSS you can ever work with. There was
freedom in working, we were producing high quality of creative work and
enjoying life. I wanted to be like her, a good boss.
Today, I have my own setup at
my home. I am enjoying working from home. Working with my family. I have a
small lab where I have 3 computers, printer, scanner, fax, broadband. It was
hard to find work when I started. But, I worked hard, did some telemarketing,
SEO of my portfolio, etc.. I concentrated on the quality not quantity of work.
Today I have a good line of clients. I have been working with great resources.
All my resources are talented and creative.
If you also want to work from
home then start today, it is difficult but most interesting to be you OWN BOSS.
If you want my help to finding work online, then contact me. I will be great if
I can help you…
Thanks for your time!!!
Tuesday, 6 November 2012
Feather Radius for Cut-Outs in Photoshop
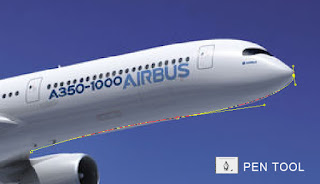
So, now you know Pen Tool, know how to work with Layers and it's time for Feather Radius. Feather Radius is also an interesting tool of PS. We use this when we want to create a transparent object. We call it Cut-Out in publishing line. Means we want to remove background and want Aeroplane (see image below).
Now, we will find out that how can we use Feather Radius for better designs. For that we open any image or photograph in PS and make a selection with the Pen tool.
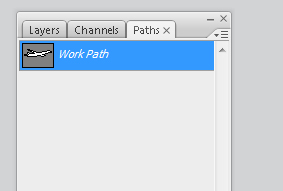
After completing selection we go to Path Panel (showing in the image below) and right click on the path.
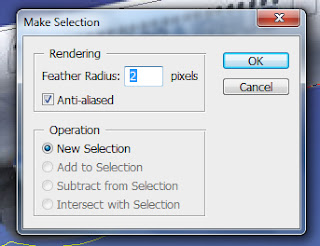
Now we click on the Make Selection and we get Make Selection Window as shown in the image below. Here we set the radius of selection. Now click OK and your selection is done.
All is done, now time to copy this object and paste in different file. You have save this file in default format as .psd or save in different format too as .png, .tiff, .jpeg, etc..
There might be some difficulties doing this. And please if you have any problem doing this then write your problem/issue/error in comment and I will create a tutorial especially for you.
Thanks for your time…
I have created this background (Cloud design for World Monuments Collage) by using Photoshop's Cut-Out method. Share your designs...

Now, we will find out that how can we use Feather Radius for better designs. For that we open any image or photograph in PS and make a selection with the Pen tool.

After completing selection we go to Path Panel (showing in the image below) and right click on the path.
Now we click on the Make Selection and we get Make Selection Window as shown in the image below. Here we set the radius of selection. Now click OK and your selection is done.

All is done, now time to copy this object and paste in different file. You have save this file in default format as .psd or save in different format too as .png, .tiff, .jpeg, etc..
There might be some difficulties doing this. And please if you have any problem doing this then write your problem/issue/error in comment and I will create a tutorial especially for you.
Thanks for your time…
I have created this background (Cloud design for World Monuments Collage) by using Photoshop's Cut-Out method. Share your designs...
Tuesday, 30 October 2012
Road Map Design in Brochures and Newsletters
Designing for any advertisement or promotional have been so
good for me. When I design any corporate brochure for any company where contact
and address have importance there I always use a extra element and that is
Location Map, Site Map or we can say Location Map. We use this when we are
making any poster for a event, exhibition, competition, performance, inauguration, etc..
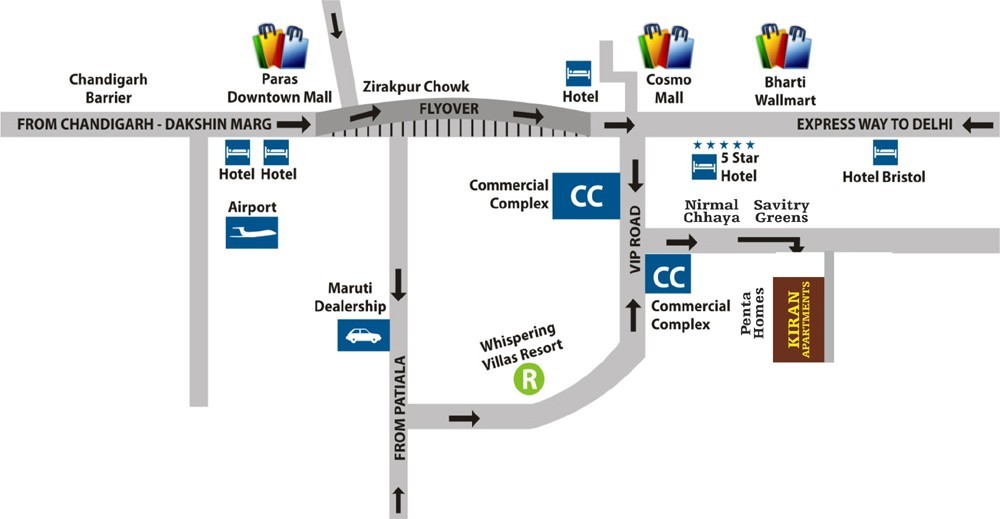
Here I have attached a sample for location map of a Real Estate Company that is
going to launch a new project in Dehradun.
I always use these kind of elements to make a better and
beautiful design. I have used orange color lines for roads and blue part to
show river. I have also used compass to understand the view of Location Map.
Here I have collected some examples which are designed very well. I hope you
liked the idea. If you have any better solution to design a location map then
attach a link here in comment option.
 |
| Reference: http://www.lvpei.org/location-map-hyderabad.html |
 |
| Reference: http://makaansearch.com/kiran-apartments-vip-road-zirakpur.php |

I will be waiting for your response…
Wednesday, 10 October 2012
Resume of a Graphic Designer
I am a graphic designer and know the importance of my resume and portfolio. I have 5 years experience in design and have given hundreds of interviews and that is just to write this post. Because I want to help freshers and beginners to find a better job where they can grow and develop their skills. This post covering very basic information to design a better Resume, Curriculum Vitae or Bio-Data, at the end of article we will also provide a sample to download and edit directly in MS Office.
Your resume play a very important role to find a good job. It should reflect each and every skill. There are 5 most important things to remember while creating a resume.
If you have any issue with the previous company or current company then don't mention it's reference number because after verification you could have problem. So, go to that company and solve that matter and if it don't work then contact us we will give you better solution for that from our professionals.
You need to mention years of passing, your grade and division if you were good in that and if not then don't need to mention.
Here we have given a format sample for your resume. Download it and edit as you want. It will help you to create a better resume for your interview. Best of luck for your interview in advance. If you need any help from me about Online Portfolio, Work Sample or about anything then write in the comment option and I will be here for you.
RESUME FORMAT SAMPLE
Thanks for your time...
Your resume play a very important role to find a good job. It should reflect each and every skill. There are 5 most important things to remember while creating a resume.
1. About you:
- You should write your name in Bold or you can inhance it's size.
- Write your contact number or mobile number below your name.
- Write your present address.
- Write down your online portfolio link, if you don't have then do not worry I will help to create that.
2. Experience: (if you have)
- Present Company : (Name, Web Address and any Reference Name & Number)
- Previous Company : (Name, Web Address and any Reference Name & Number)
If you have any issue with the previous company or current company then don't mention it's reference number because after verification you could have problem. So, go to that company and solve that matter and if it don't work then contact us we will give you better solution for that from our professionals.
3. Education:
- Degrees (Post-Graduate and UG)
- Diplomas (Related to Computer and Graphic Designing)
- School Education (Matriculation and Intermediate)
You need to mention years of passing, your grade and division if you were good in that and if not then don't need to mention.
4. Awards
- Awards in any competition or event related to Art & Craft or Design
5. Software Skills:
Software play a very important role for the job. Today a person should be multi-tasking but if you are applying for any international company then you should have specialization in at-least one software whether it is Photoshop, InDesign, Illustrator or QuarkExpress. You should be 100% in at least one program. And that will help you to find a good job in any MNC.Here we have given a format sample for your resume. Download it and edit as you want. It will help you to create a better resume for your interview. Best of luck for your interview in advance. If you need any help from me about Online Portfolio, Work Sample or about anything then write in the comment option and I will be here for you.
RESUME FORMAT SAMPLE
Thanks for your time...
Tuesday, 9 October 2012
Why change Text to Curve in Print Ready PDFs
A professional DTP Operator/Graphic Designer always curve the fonts before send file to print. It is very important thing to remember because if you do not curve fonts then the final print could be shocking. Because when we create any design in any DTP software like; InDesign, Pagemaker, CorelDraw, Quark, Illustrator, Photoshop, etc.., we always use different fonts for typography design and type-settings.
We use different for heading and different for body. When exporting file to EPS, TIFF or PDF we should always send those fonts to printer. And before opening our file a printer should install all given fonts. But, if he/she don't do that the result might be shocking and our print could e damage. So, to be safe from this issue we always "Curve all Fonts" before exporting an output. And it is 100% safe for print. The ways to curve the fonts in different software is different. Here we are going to explain about the possible software and the trick to curve the fonts with them:
CorelDraw (Versions - 11 12 14 15 X1 X2 X3 X4 X5):
Select the Text and Press Ctrl+Q. It curve all the selected text. You can select all text in once as, Go to Edit then Select then Select All Text and now press Ctrl+Q.
InDesign (Versions: CS CS2 CS3 CS4 CS5 CS5.5 CS6):
Select all text and now go to Type and click to Create Outlines. It will convert all the text to Curve (Artwork), Now, Text-Edits tool will not work on it.
Quark Express (Versions: 7 8 9 10):
Go to Item and click Convert Text to Box. If you are using QuarkXpress 8 then you can convert any amount of text to outlines and all at once. And the outlines will retain the appearance of the original text - color, transparency, drop shadow, etc..
Photoshop (Versions: All):
Create a New Layer now select both Text Layer and Newly Created Layer and Press Ctrl+E. It will merge both layers and your text will be curved but it will become raster art and you can not edit it with Direct Selection Tool. But file could be send to printer for final print.
If you are using any different software for type-setting and formatting and want to know the easy way to "Convert Text to Curve" then write your software name and it's version and your the problem you facing. I will create a best tutorial for you.
Thanks for your time...
Tuesday, 25 September 2012
2nd Hand Bikes in Delhi : Karolbagh
Delhi is famous city for its import-export and sale-purchase business. Chandni Chownk for second hand shoes, Chor Bazaar for watches, Daryaganj for books and the famouse Karolbagh for Automobiles.
If you want to purchase a good condition, stylish and updated model of any bike then go to Karolbagh, Delhi. You can find any bike you desire and also purchase just paying the value. There is not problem for paper work. You just need to give you Identity Card or Driver License and Address Proof and one more thing.. "MONEY" and bike is yours.No jhanjhat of anything. One more thing I will share here. Today I gone to Karolbagh and researched on the rates of bikes and also document needs to purchase any bike. I found some interesting things I am describing here...
Value of Bikes:
When we like any model of bike and ask for the it's value. Salesman reply, "40,000 Rs. or isse aik rupya kam nahi hoga. Bike ki condition dekh lijiye or phir aap poori market men try kar lijiye isse achchi bike aapko kahin nahi milegi."
Good Jock! Never think about what he said just tell him what your mind think. If you think that the bike value should be 20,000 Rs. Tell him clearly that you can give 18,000 Rs for that and now see the result. He will start saying, "Bhai kya baat kar rahe ho, aisa kuch nahi ham kam se kam 35,000 Rs. kar sakte hain or wo bhi jis costomer ki bike hai usse poochne ke baad (Actually there are two types of bikes one is their own and others are the saler's bike who want to sale his bike but don't have time so left his bike there and pays 1000 Rs. commission when deal is final.)".
Reply anything but don't increase your value. Time to leave that shop and you will see the salesman will stop you and say "Bhai 32,000 Rs. Final hain leni hai to lo aapki marzi.". Now tell him that you can give 20,000 Rs. and then he will reply 28,000 Rs.
Now it depends on you that how can you broke this deal smartly. Do anything but purchase that bike in 20,000 Rs to 25,000 Rs and be a smart buyer.
Document Required:
Identity Card (Election Card/Passport/DL)
Address Proof
Outside of Delhi:
If you are from Kashmir to Kanya-kumari but not from Delhi. Then NO PROBLEM! just give a proper documentation and a take any relative or friend with you who is from Delhi. Then everything will be fine and bike will be transfer on your name.
Finance for 2nd Hand Bikes:
Think if you like a bike worth Rs. 30,000 but you don't have that money right now then just ask for Post-Dated Check or that you are paying 25,000 in cash and giving a check for 5 thousands. It can work but it don't work then one more solution for you.
Take a friend or relative with you who is from Delhi and have a home at Delhi. His address proof is enough for your finance.
For more information write your query in comment and I will find a best answer for you.
Thanks for your time!!!
Thursday, 6 September 2012
Working with Translation Workspace XLIFF Editor
Open the file with double click on it.

Click the close on the first windows (Now it will be like Image 2)

Change the font as per your language from View > Document view >
Fonts (it will change the document font)
Now change the Working string font as well from View > Segment View
> Font (It will change the opened segment font view.
 |
| Document View |
 |
| Segment View |
While doing the above 2 steps, you will find the window as given below.
Where you need to choose your font. You can choose the font size as weill.

Now you are ready to translate the file.
Below are the login procedure.
Click on the Not Connected Menu (Red circled in the image)
It will ask for User ID and password
User ID: ********
Password: ********Tenants: ********

Then Press OK
Now choose the TM to be used for the translation and Press Ok.

Now choose the language pair and press OK

Now you are connected to the TM.
Let’s move towards the working segments.
Press ALT + HOME

Once you complete the translation Press ALT + +
You will move to the next segment. Please follow the same till the
document gets complete.
DO NOT FORGET TO SAVE YOUR DOCUMENT WITH CLTR + S.
Wednesday, 5 September 2012
Creating Templates for Multi-Lingual-Desktop-Publishing

90 percent translation
companies provide Desktop Publishing Services. Every
document needs formatting after translation because every language have
different punctuation marks and have word expansions or reductions
that affect the source layout. We cannot send the document without any
professional type-setter touch.
Here I am Sumit Pundeer, working as a formatter and type-setter
for a translation company and sharing my experience that how I dealt with multi-lingual-documents. When we receive any document for translation in
multi-languages, first of all we create a template for that. We create style
for all the different text properties used in that file like, body-text,
heading, pagination, footer, header, etc..
We share those styles to
translators and instruct them to use styles while translating the target documents.
When we receive translated files, we share it to formatters in native language
and they make it 100 percent correct. It don’t takes time to finish the
formatting if we already created styles for the target files. So, if you are
using Adobe InDesign, CorelDraw, Pagemaker, QuarkExpress, MS Word, PowerPoint,
or any other DTP software then you don’t need to work hard when formatting the
document. Just create style for the file in MS Word and share it to translators
after that import that file in your target software and all the styles will
imported automatically. This is the best way to deal with Multi-Lingual-Content-Formatting.
For more information
contact me at mediasixteen@gmail.com or
call me at 091.995.32.2230.
Tuesday, 4 September 2012
Formatting Styles in MS Word
It saves lots of time when
we use STYLES in formatting with MS Word, CorelDraw, InDesign, Pagemaker, Quark
Express or any other DTP software. When we format any document whether it is
book, magazine or any other material containing lot of text in it. We have to
format it with the consistency and to maintain that we need to create a
template document. In this document we set up styles for heading, bodytext,
bullet-styles, header, footer and for pagination too. We save it and use in all
the chapters, lessons or parts etc..
Here in MS Word we can
create a style simply with this toolbar option showing in the image below.

Just change your text as
you want and click on style option button and then click on the save style
button as shown in image 2.

Give a proper name to the
style and click on ok button.
You can modify your style
anytime when you want. For that just Right Click on the Style you want to edit and
then click on modify button as shown in image 3.

You can also import styles
from a different file in Word for that just follow these steps…
Click on the button shown
in image below.

Now click on manage styles
button as shown in image below.

- In Manage Styles window click on the Import/Export button.
- Then click on choose file button…
- Then click on open file button…
Now select the file you
want to import styles and select the styles you want to import…
For more informations
contact me on mediasixteen@gmail.com
or call me at 091 995 352 2230 (India). Thanks for your time.
Saturday, 18 August 2012
Paragraph Space between Numbering Styles in MS Word
Formatting
is a technical job. Everytime we have to face new problems and to solve them we
take advantage of internet. Here one problem I was having when layouting and
formatting a Italian Language File. It
was the translated document to format according to source PDF.
To solve it problem I just selected
the Numbering Styles Paragraph.
Then pressed Righ-Click on
Mouse.
That will open a Paragraph Window
(showing below).
Now we just need to uncheck an option
showing in image below, that is; Don’t add space between paragraph of same
style.

Now you problem is solved, just
click OK button and see the result.
Thanks for your visit.
Friday, 17 August 2012
Use Duplicate Option in CorelDraw
Duplicate option is the main feature of CorelDraw and a
unique tool to design creative vector shapes. Here we will show you how you can
use this tool.
How to use Duplicate Tool to create duplicates in order:
Step 01:
Create any object with Shape Tool

Color it as you want, I have colored
it light blue

Step 02:
Now we have three different options
to create it’s duplicate.
We just need to select the Elipse
and press + button on keyboard. It will create a duplicate of the
Elipse.
Step 03:
Now press Right Arrow Button
and give it a proper position next to first Elipse.

Step 04:
Now press Ctrl+D (Duplicate
Shortkey). Press this key as much objects you want to create in same order. Now
do it as you want and you can do it with any shape or any object in CorelDraw.
Here I have created a design using Duplicate Tool.

So, here we have found that we can
create Duplicate using two options first is to press + button on
keyboard and second with short-key Ctrl+D.
There are lot of things you can do
with this option. For Step 03 we have one more option. We can also use
mouse to give a placement to second elipse. On that time we need to press Shift
key, if we want it in parallel. We can also do it without pressing + button
for duplication. Just Left click on the Elipse and drag it
with mouse, do not hold it. When you hold the Elipse at that time press Right
Click on your mouse. It will create a copy of Elipse and now you just need
to press Ctrl+D for creating series of objects.
Practice
on different shapes and objects and you will know a beautiful function of
CorelDraw. Share with me how you have used it. I am waiting for your comments.
Thursday, 16 August 2012
Object Drawing in CorelDraw
CorelDraw
is best to design objects like diagrams for medical books, vector illustration
and typography design. In this tutorial we will know basic of object design. Here we will
explain;
·
How to
draw a Rectangle with Rounded Corner
·
How to curve
and edit an Object
·
How to
draw Arrow and other Symbols
There are lot of options to drawing in CorelDraw. First of
all we will explain Rectangle.
To draw a Rectangle we use Rectangle Tool (show below in
image).
 |
| Rectangle Tool |
 |
| Pick Tool |
 |
| Shape Tool |
Drawing a Rounded Corner Rectangle in CorelDraw
Step 01:
Select
the Rectangle tool.
Now
click and drag as you want and where you want to draw rectangle.
OK, you have drawn your rectangle, now want
to change it’s corner to rounded.
There are two options to do it.
There are two options to do it.
Step 02:
Click
on rectangle with Pick Tool.
Now
select Pick Tool and click on the corners of Rectangle.
And
drag your mouse left to right.
You
will see rounded corner rectangle.
Adjust
how you want the corners and it’s done.
Step 03:
There
is one more option for rounded corner rectangle.
Select
the rectangle with Pick Tool and change options given in image below.
 |
| Options for Rounded Corner Object |
By
this option you can give a different rounded scale to each corner.
Practice
again and again with this and you will understand it deeply.
Converting to curve an object
Simply select the object with
Pick Tool and Press Ctrl+Q (shortkey for curve).
It will convert your rectangle or any
other object to curve.
Now you can edit this object with
Shape tool and transform it as you want.
Drawing Stylized Arrow in CorelDraw
Click on the Arrow Shapes tool
and select option as shown in image below.

Now you will see a palate on
the top your page as shown in image below.

Select any better one and draw and
enjoy.
There are lot of options for drawing like;
·
Polygen
·
Star
·
Complex
Star
·
Graph
Paper
·
Spiral
Try each option and practice a lot. If you have any problem
using any tool then share it in comment option and I will let you know how to
resolve it. You can also ask any question just put your question in comment
option and I will answer you soon.
Subscribe to:
Posts (Atom)