Wednesday, 30 November 2011

Type in Hindi with you Laptop

If you want to type in Hindi font on your laptop, notebook, imac, tablet PC, etc. Then you just need to use Character Map Function of Windows. Character Map is available in each and every Windows. Window 7, Window Vista or Window XP (any service pack) have this function to type some special characters. If you want to know more about Character Map just click on this link.....
http://mediasixteen.blogspot.com/2011/09/character-map-in-xpseven.html

Monday, 28 November 2011

Problem with Hindi Keyboard

Today, when globalization is in, language barrier has ceased to matter. Specially with advertising sector. People are ready to pay good amount of money and get their work outsourced, all they look for is quality work. So if you are getting some work form some other country with a language you are not much aware of it don't panic. you can still complete your work with the help of tutorials one like I have shared here. This one is exclusively about Hindi language typing and the problems being faced while working on it. Have a happy reading. :)
If you want to work on a Hindi Keyboard and having confusion about "matras". Don't worry, just use this keyboard image for your reference and problem will be solved. In this keyboard all "matras" are shown perfectly.

For example if somewhere is written "ang ki bindi" it is shows as below.


The light color alphabet is just for your reference for the position of matra. Download the keyboard image and start typing in Hindi Language.


Keyboard for Hindi Typing in KrutiDev, Devnagari and Walkman
: I N S T R U C T I O N S    T O    U S E    T H I S    I M A G E :
  1. Open this image with Window Photo Viewer. Now adjust the windows in such a way that you can see both the keyboard and MS Office or other DTP Software ( shown below). This will help you to look for reference of words and 'Matras' whenever you require very easily.   
    Screen shot of stacked windows

  2. Now start typing with the help of Keyboard Layout and do it for 2 or 3 hours. Repeat this exercise daily and in just one week you will be able to type in Hindi Language.
  3. By continuous practise of Hindi typing the letters will get memorized. Your mind will work on it and your finger will go automatically on the right button. 
  4. Wow! you can type in Hindi now.

You can use this keyboard while typing with KrutiDev, Devnagari and Walkman fonts, it will also work with Chanakya font, only 3 or 4 character will be different.
If you are having any problem using this Keyboard or want to know more about Hindi Typing Tricks and Tutorials then write your query in comment option.
Thanks for your time.

Friday, 25 November 2011

Font Missing in CorelDraw

I'm working on a school magazine layout. There is a problem of fonts, Kruti Dev 020, Chanakya, etc.. is missing from my computer. I have copied font but when I paste it, it shows Kruti Dev 021. I don't know about this. But I have found a solution for this problem.

Solution can be a good alternative. Sometimes we have to work on some Corel Files immediately, when we don't have to time to ask for missing fonts. May be there is some spelling mistakes, in content or can be any changes in color or images. That time open that Corel File and when you see this window (Shown Below), Click to Temporary Option (highlight with red color) and open that file. 

Change whatever you want to change but don't change any font. Now save it and send back to the client when he/she will open it. It will open exactly as it was. It is only an alternative. Now if you want to download fonts then download from Internet 90 percent fonts you can find in Free and there may be some payable fonts also. 


You can also substitute the font with other font you like. For this Click on the "Show All Fonts" option and then click on the "Substitute font with:" button. There you will find all your computer fonts.

Having any problem doing this? Comment on my post and I will suggest you a good solution... waiting for your comment...

Thursday, 24 November 2011

Cleaning the Artwork for Digital Coloring

When we start working on any artwork to color. First of all we scan it in black and white option then we clean that artwork. Because when we scan with black and white, it shows some black patches on the artwork, that should be cleaned for quality coloring. Subscribe us for more videos about Digital Coloring. Thanks


Wednesday, 23 November 2011

Convert Windows sp2 to sp3 in 60 seconds

Yesterday I found that the best game I have downloaded from my friend’s pen drive requires window XP3 to run but I have XP Service Pack 2. Now what should I do, I asked to my IT person. I am a graphic designer working freelance from home.

Here is the idea that most of the programs usually look into the info about the system status in the registry file to locate the software and patches which decides their performance. Now you can make fool such programs which requires Windows XP SP3 patch by altering the Windows XP SP2 version info. For that you just have to press command (Using windows key +R) and then, type regedit to open Registry Editor. Now you see registry editor opened then only browse to the following key shown below.

HKEY_LOCAL_MACHINE\SYSTEM\ CurrentControlSet\ Control\ Windows

Modify “CSDVersion” from “0×00000200” (SP2) to the Windows XP SP3 value of “0×00000300” and reboot the computer or laptop.

If it doesn’t work then you can download the Automatic Registry Settings. Install this and do what you want.


You don't need to update or repair or restore your current window. You will have all the software running by these changes in registry files. It would not effect any software, like file error, update your window version, any kind of error message will not occurred by this change.
Thanks for your time and patience to read this article. I hope you found the answer.

If you are not getting this then you can watch this video here I have used window 7 to show you. You can easily understand by this video that what you will have to do to change your window from xp2 to xp3.

Invoice For Illustration Job

If you are an illustrator / graphic designer / visualizer / DTP operator or anything like this. You work from home and when your job is completed, you want to create an invoice or bill for your work then you need to take care of these things.
First of all I want to explain the points highlighted on the invoice shown in the article.

  1. Logo or name of your company, organization. You can also write your name here if you don't own a company.
  2. Here you can write your complete address, it should be proper address of your company. You can also mention your email address and website address of your company. Also mobile or landline number, any contact number.
  3. Here you will have to write the name of company for you done the job. If I have worked for Google, Bing, Youtube, etc., then I will have to write Google or Youtube here. You can show the complete address of that company, contact number, website address and logo also.
  4. This is having 3 information about your bill, invoice date, total due and due date. When we create any invoice, we need to write these details on the bill and it should also be highlighted.
  5. Description explains that what you did. It explains about your work, job done for the company. If you have work for any storyboard then your can write here all the details about project. You can show how many frames you did. If you have created any logo, layout, header, illustration, icon, identity, advertisement design, etc., you can write here all about this.
    We will have to mention the quantity and hours, we worked. Also rate/price we charge. In the last option we total the amount of our one project.
  6. This is for subtotal, tax we pay for the payment, previous balance details, if we have taken some money in cash or cheque, and the last one option is total due balance.
  7. Payment details will have all the informations about company or your bank account here you will mention your PAN number for tax paying. If you don't own any bank account you can have self cheque too. But in PAN number is must to show.
You can also advertise about your company here in this invoice, also can play with the design of the invoice. You can give a message for the company you done the job that you have enjoyed working with that, etc..
Thanks for paying attention, if you see any mistake or want to mention anything in this article, you can write your message in comment option. I am waiting for your response. Thanks for your time.

Tuesday, 22 November 2011

Header Option for Science Book

This header is suitable for Science Book. If you want to change your header in each lesson then you can use header like this for animals lesson. Which lesson will be related to animals you can use this kind of header.
You can use the clipart of different types of animals. You can also play with the font but that should be clear for children to recognize.
If you want to create a header for Science Book's plant chapter then you can take some kind of plants clipart and also can use some grass patches on the ground.

Remove and Add-on Extensions in Google Chrome

If you want to remove Google Chrome Extensions you will have to follow these options.
Click on the Right Top Customize and Control Google Chrome Button then click on the Tools Option and then Extensions Option then Remove or Add them. If you want to see a complete tutorial about this then read this article. There you will get all the details about Extensions.
First you will have to click on the button Customize and control google chrome , showing right and top side of the window.
When you will click on this button, you will see a lot of option there like:
  1. Creating a new tab
  2. Opening a new window
  3. Opening a new incognito window
  4. Bookmarks, how to add, delete bookmarks
  5. Editing tools, like cut, copy and paste
  6. Zoom option of window
  7. You can save your page
  8. Find something on the page
  9. Printing option
  10. Tools: In tools option you will see lot of options like:
    a. You can create application shortcuts by it's first option.
    b. Extensions is the option we talking about in this tutorial. Here you can add, modify and remove your extensions in Google Chrome.
    c. Clear Browsing data option is very good option in google chrome or internet explorer. By this you can clean your browsing data and no-one can find out what you did with the internet.
    d. Reporting an issue option
    e. Encoding option
    f. View source is also a good tool in google chrome and internet
    g. Developer Tool option
    h. JavaScript console option
  11. History means history. We forget sometimes, what we did, what we opened on internet. History is a good option to find out what we did in last week, last month, or day.
  12. Downloads option to find out what did you download.
  13. Options: Here you will find some important options of google chrome.
    By clicking on this option button a new tab will open, for more details see in the image below.

    Here we see 4 options Basics, Personal Stuff, Under the Hood and Extensions.
    Extensions is the option we are searching for. Click on the Extensions. You will see this window.

    Here are three major options to control extensions. First One is Enabled Option.
    Enable Option: By this option you can control your extensions. If you don't like them and want to remove for temporary use then you can uncheck the enable option.
    Remove Option: If you don't like to have extensions in your chrome then you can remove all of them or selected.
    Get More Extensions: By this option you can add more extensions to your google chrome.
I hope you got this and don't have any confusion in your mind. If you have any then write down your problem in comment option and I will solve it soon. Thanks for your time.


Saturday, 19 November 2011

Digital Coloring with Hard Brush

In this tutorial you will know that how to color with hard brush in Photoshop.
You need to have Photoshop Software (any version) and an artwork to color. First open your artwork in Photoshop. Now select the brush, shown in the image below.
Hard Round Pixels Brush in Photoshop

Here you will have to choose hard round brush. You can take any size what you want.
Press F6 (Brush Window), Change some properties in Brush Tip Shape (shown in the image below). Change hardness to 100%. Now, you can start coloring with this brush.
Brush Tip Shape Option in Photoshop

Thanks for your time.

Friday, 18 November 2011

Typing Work From Home

I was very upset, left my job and was free at my home. I did not join any company because I don't want to join a company that pays me half of my skills. So, I decided that I will work from home. I started working but that was not working well. I got some work for digital coloring and finished it. I got some money but that was not enough for me to pay my room rent too.
I decided to visit the market, publishers, studios, add agencies, for the freelance work. Then, I got some work from a publication. The work was, Hindi, Sanskrit, Punjabi, Urdu & English Typing. That content was related to school magazine. All the articles was written by school boys and girls. The project was typing, layouting, adding clip arts, and make it to ready for print.
That was 40 pages magazine. I got 50 rupees/ 1 Dollar for per page. I typed my first magazine in 1 and half day and half day I took for layouting and cliparts. That was 1500 in two days. I completed 20 magazine in one month and got 30,000 rupees.
Now you can understand that if you know how to type, you can earn from home.
Tell me how you make money by typing in Hindi and English.

Job Details:
Hindi Typing
20 Pages (including: Sanskrit, Home Science, Science, Mathematics & General Knowledge)
English Typing
20 (including: Science, Mathematics, General Knowledge, etc..)
Content Pages
3 (Principal's Message, Editor's Note, School Annual Report, etc..)


Photographs and Drawings
12 Pages (Annual Day, Sport's Day, Yuva Club, Eco Club, Primary Section, Independence and Republic Day, etc..)

Job was so cool, I enjoyed working with school magazines and I didn't left a single article for adding in school magazine. I know that how a child feel when he/she see his article in school magazine. It is same about photograph.
If you want this kind of work you can also contact publishers who deals in school magazines.

Thanks 

Wednesday, 16 November 2011

How to Play Dual Audio


Today every movie is available in Dual Audio Format. But the default language is English or any other and you want to change it's language. Then you need to follow these steps:

You will be using different video player for it and here first of all we will discuss about Media Player Classic. You can download this player online.


For example I'm gonna play this movie, this is Dual Audio Movie 1080. I'm gonna use Media Player Classic to play.
Now, right click on the Video File and Click to Volume option. You will get the options, change it how you want [see image for reference].


Dual Audio Option in Media Player Classic


VLC player is also a great Video Player, it can play each and every format of Vidoe. To play dual audio it it we follow these steps:
Right Click on the Clip and click on Audio>Audio Track>Hindi and English Option.


Dual Audio Option in VLC Player


When we play any Dual Audio Movie in Window Media Player. It does not work. Window Media Player shows an error and don't play the video. But if you know any option to play Dual Audio movie in WMP then please write in comment option. It will help the other users who are facing this problem.

Window Media Player showing error playing Dual Audio
Every day new Video and Audio formats are generating and we also have new software to play them. If you know some interesting thing to share then please write in comment option. And if you have any problem playing Dual Audio then just write your problem in comment box and I will help to solve it.
Thanks for your time.

Tuesday, 15 November 2011

Short Keys & Actions in Photoshop Digital Coloring : Part 02

To create a New Action in photoshop you will have to follow these steps.
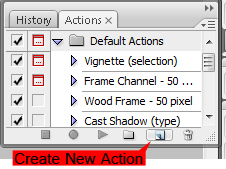
First of all, open the action window and then click New Action Option shown in the image below.
Create New Action Button in Photoshop
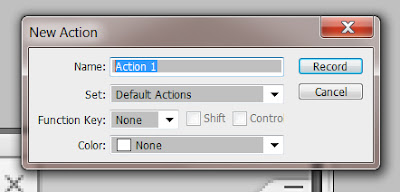
Now, when we click on this option we see New Action Window, where we can rename this action and also select a shortcut editing, Function Key Option. There I mostly use F2 command. You can select any other button suitable for you.
New Action Window in Photoshop
Now, we click on the record option. The red button shown in the image, showing that photoshop is recording your actions. Now do what you want to record and then click on the stop option. Your action is ready now.

Thanks for you time.

Short Keys & Actions in Photoshop Digital Coloring : Part 01

Photoshop is best application for digital colouring, everybody knows that. If you are a smart coloring artist then you need to know about short keys and actions in photoshop.
There are some short keys like, T for Text, L for Lesso Tool, M for Marque tool, C for Crop tool, etc., But if there is anything you want to create your own short key in photoshop, you will have to use action option.
I want to share you one of my experience that will show you the importance of actions.
Once I got a project of digital coloring. I got the artwork and had to do coloring on different layer and inking on different layer. Coloring had to do with hard brush in photoshop.
I did digital inking first with hard brush (3 pixel), then I created a new layer and locked one (inking layer). While selecting with Magic Wand Tool, I added the color on the document it was showing white space around the line. Look in the image 1:
Image 1


Image 02
So I used other option to color that artwork.
First I selected with magic wand tool and then I use Expand option of photoshop you can see in image 2.
Image 3 is showing the entry of pixels. I used 2 pixels in this.

Image 03
I filled the color in expanded selection and It worked. I had to do this again and again so, I created Action for this option.
If you know that how to create Action then Ok, if not click here to know.
How to Create Action in Photoshop?

Monday, 7 November 2011

Exporting PDF in CorelDraw

If you want to export your pages in PDF format for printing then  first you need to export EPS files of your pages in multiple options. You can change your settings for the EPS that will export all pages of your document in single click.
Then, use Adobe Distiller and import the all EPS files.
Now select option 'High Quality Printing' in Distiller and export the project on your selected destination.
Exported file will be good for printing.

If you are exporting EPS from your corel draw then you will not have these problems, like:
  • Font looks corrupt in exported pdf
  • Some objects are missing in pdf while exporting
  • Quality of pdf is not good for printing
  • File is corrupted while exporting pdf file
If you want to know more about CorelDraw solutions, you can write me your question in the comment option. I'll create a tutorial especially for you.
Thanks for your time.

Saturday, 5 November 2011

Design Headers for Books

Designing A Header : in CorelDraw, Indesign, Illustrator or QuarkExpress
When you work on any book layout and want to stylize headers, footers, pagination, etc., this tutorial will help you to understand it. When we want to design header, first we consider the content of the chapter or unit. If this is a science book then we use science elements in the header and if that is mathematics book then the mathematics elements.
When we work on children books, we can play with insects, animals, birds, trees and plants. Here you can see a good example of header.
These are points to remember while designing a header for children books.
  • Font for the header should be clear, childish and smart. For better example you can use Comic Sans font.
  • We should use different design of header for a different chapter that the children will not bother watching it again and again. At least you should change the color of stripes.
  • We should use enough space for header. For example we can use 2 inch for the unit.

Click here to download header for redesign.


Friday, 4 November 2011

Jobs On Photoshop

Photoshop is a very useful software for graphic and design. There are lot of things we can create by  photoshop. I'm a graphic artist here I'll explain you that how I have used this software.
First time in my life I used this software when I was working as a script writer in a news channel. There we got some time to relax and I felt to use that time so I opened up the software and started working on it. It was great using photoshop. I started working on the image of Angelina Jolie. I used effects option of the photoshop. 

Cut Marks or Crop Marks in Desktop Publishing

Is this happened you?
You finished your job in time. Your senior finalize it and you send it for printing. But what happened next? When it comes to printing you have not given crop marks, bleed marks on the PDF or EPS file. Now, your document is printed but there is white space on the corner and your text and design is cut while printing. All this happened because you don't know about bleed and cut marks. It could grab your job. You could be fired if you do so.
In this tutorial you will know about the crop marks or cut marks. When we design any book, brochure, flyer, etc. and we start to create a new document there are lot of options like page size, orientation, bleed, slug, etc.. So while doing this we can set our bleed size, usually we give 2 mm bleed on the top, bottom, right and left.
Now when your document is finished so you will have to tell the printer about bleed area and cut line. To show cut line to printer we give crop marks. 
Image shown below is the example for cut marks. There you can see that on the corners there is black marks. These marks are given for printer to cut the page. We don't spread our cut marks on the bleed area otherwise it does not work well.

Thursday, 3 November 2011

Freelancing is Cool if You Know How to Manage

Hi this is Sumit, a Freelance Graphic Designer from India. I want to share some experience that will be beneficial for you if you want to start as Freelancer. I did job in starting and same I suggest to you, you should start working as employee and should co-operate with your team. Learn AS MUCH AS YOU CAN from them. From start to end, you should be curios about everything.

Because a graphic designer and freelance graphic designer should have everything in him/her. Planning, Gathering contents, Designing and finishing with the best possible option. In Indian Market you don't get the client who expect your designs at first sight. They always demand for change. So, what you should always do, know the taste of your client. Sit with him, ask which type of designs they like. Ask them, "Dear Sir, I can design good but If you will help me to do. Please suggest me some colors, fonts and samples of designs from internet. And I will give my best."

Respecting your client is must for you even if he want all his creatives in Desi Style. Because you will get paid only after satisfying the client not to you. So, understand what they want then do your home work. Home work means don't finish the design if you have any query in your mind. Just create the sample, a rough sample using Corel, Photoshop and other tools and show that. Which the client like most finish it. If you will give your finished sample at first time, they will change it. So, go with the rough first time.

Also when you share samples with the client. Share at least 3 and maximum 3 samples. Because if you show less then they think that you have not given time to that and if you give more then they will confuse and will say you, " They are good but try more." It happened with me so give only 3 samples. One what they want. One what you want to make. And last One combination of Both.

THINGS YOU NEED TO WORK AS FREELANCER
  • YOUR FIRST CLASS PC OR MACNot very good PC if you are going for 2D Designing. But if you also work on Software like, Premiere, After-Effects, 3D-Max or Maya then you need a good System with Graphic Card.
  • INTERNET WITH GOOD SPEED & 24X7 CONNECTIVITYWhile working from home you should always be connected with internet because for each and every changes you can not go to Cyber-Cafe or to your friend. And you have to send heavy files too.
  • A LAPTOP FOR PRESENTATIONSome clients want to see the designer how he's doing their work. When a client work with you very first time you should discuss the basics with him/her on screen. When you understand him/her perfectly then can work from home.
  • SOFTWARES LIKE, COREL, PHOTOSHOP, ILLUSTRATOR, ACROBAT, MS OFFICE, ETC.We need all the software because designing creatives is not tough if you have all the tools, internet and creative mind. Software like PS, AI, ID, CDR all use for design for 2D and publications. But when we work with Multimedia we need other software...
  • INTERNET KEYWORD RESEARCHING KNOWLEDGEThis is what my boss told me when I was working as Script Writer, he asked me how much experience you have? I replied, "Sir, Six Months." Then he replied, "Now, it is 20 years and Six Months, because from now My experience will be added in yours." So, same for you, don't start working before researching over internet. Give at least 15 minutes to researching and then start working.
  • MAIL WRITING SKILLSLac of communication can reject your samples, if you can not describe or present your designs in good way then there will be problem. So, research over internet how to send official mails.
  • ENGLISH LANGUAGE PROFICIENCY It is international language and you can work with the world but if the other guy don't speak it. Take help of online translation tools you can work easily.
  • AND THE MOST IMPORTANT TIME...
    "
    TIME IS THE MOST IMPORTANT THING IN INTERNATIONAL MARKET, SO COMMIT ANYTHING BEFORE MAKING YOUR SCHEDULE."

Thanks for your time if you want to know more just send your query on my Gmail that is mediasixteen@gmail.com.

"WISHING YOU A BRIGHT FUTURE AND GOOD EARNINGS, ALWAYS"